Add the ability for your customers to call a waiter with one click and without unnecessary waiting using the online menu of your restaurant, cafe, or bar.
To fully immerse yourself in the topic, we ask you to first refer to the article "How to create a QR code for a restaurant menu?" - it contains the fundamental knowledge for further steps.
It happens that a customer comes to your establishment (restaurant, cafe, or bar) and wants to place an order, but the waiter is still not there. And what to do? Of course, in most cases, the client is mentioned in a timely manner and he does not have to wait long, but it does not always happen quickly. This is especially true when you need to ask for a check or order additional dishes. Instead of enjoying being in a restaurant, the customer has to sit and wait when the waiter catches his eye and comes to clarify the request.
The client's time is important and the speed of response to his requests creates a certain reputation.
Thanks to the contactless menu, with the ability to call the waiter, you can reduce the waiting time of customers and make their experience in your establishment more positive.
The configuration of such a menu does not require much time. You only need to make some changes in the settings of the order form and create unique QR codes with the location of the customers' tables.
The order form itself is optional and can be disabled, but its fields will be used to inform the waiter about the customer's location.
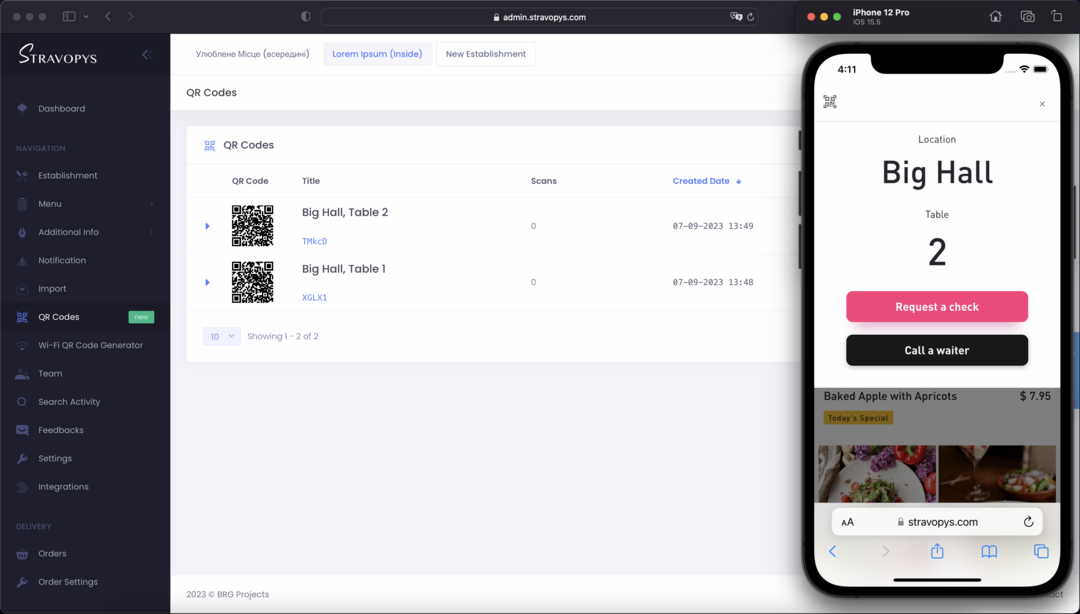
To see how it works, scan the QR code sticker below which has the link to our test establishment:

Also, there is a video with the settings of the digital menu in the administrative panel at the end of the article.
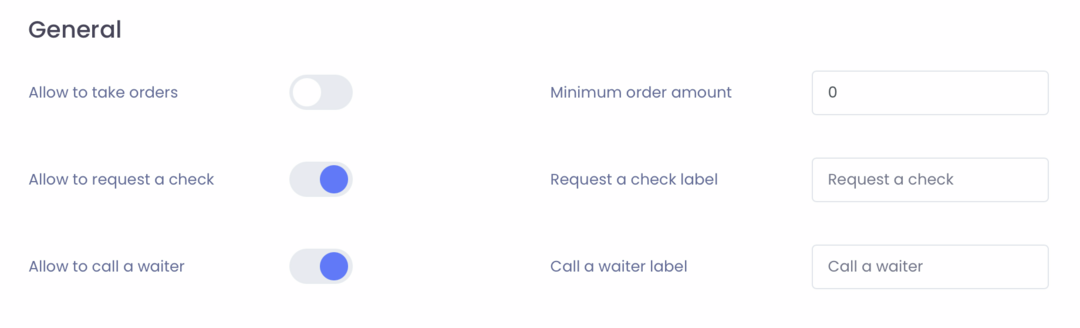
Setting up orders
- In the navigation bar, click "Order Settings".
- Select "Allow bill request".
- If necessary, enter a different name in the "Invoice request button name" field.
- Select "Allow Call Waiter".
- If necessary, enter a different name in the "Waiter call button name" field.
- Save the changes.
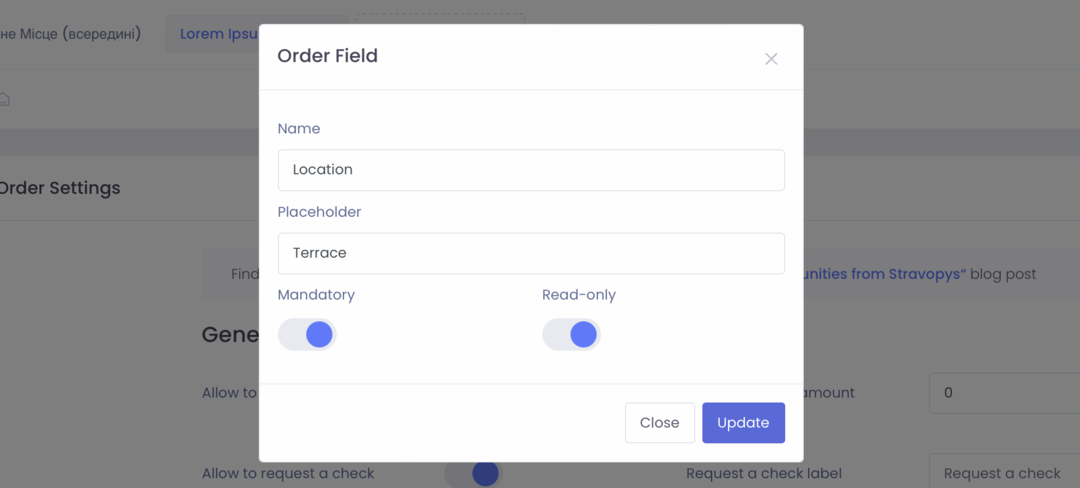
Form field settings
Each field in order customization has its own specific functions and can be used specifically for its purposes. In our case, we will work with the "Address" and "Apartment, floor" fields, which we will then adapt to the location in the middle of the institution. Depending on the type of room, you can specify the location (for example, if the institution has several halls) and the number of tables.
To set the form fields, do the following:
- Find the Form Fields section.
- Open the field for editing "Address".
- Enter a name, for example, "Location".
- Enter a hint such as "Terrace with sea view".
- Make sure the field is marked as required and read-only.
- Save the changes.
- Open the field for editing "Apartment, floor".
- Enter a name, for example, "Table".
- Enter a hint, such as "5".
- Make sure the field is marked as required and read-only.
- Save the changes.
More about field settings: How to Create a Unique QR Code Sticker for a Digital Menu with a Customer's Table Number?
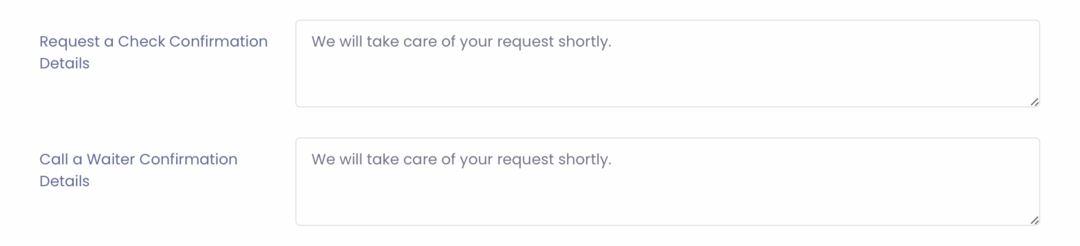
Request confirmation
If necessary, you can change the text of the invoice request confirmation and the waiter call:
- Find the Form Fields section.
- Look for the Bill Request Confirmation Details field.
- Enter the required text.
- Look for the Waiter Call Confirmation Details field.
- Enter the required text.
- Save the changes.
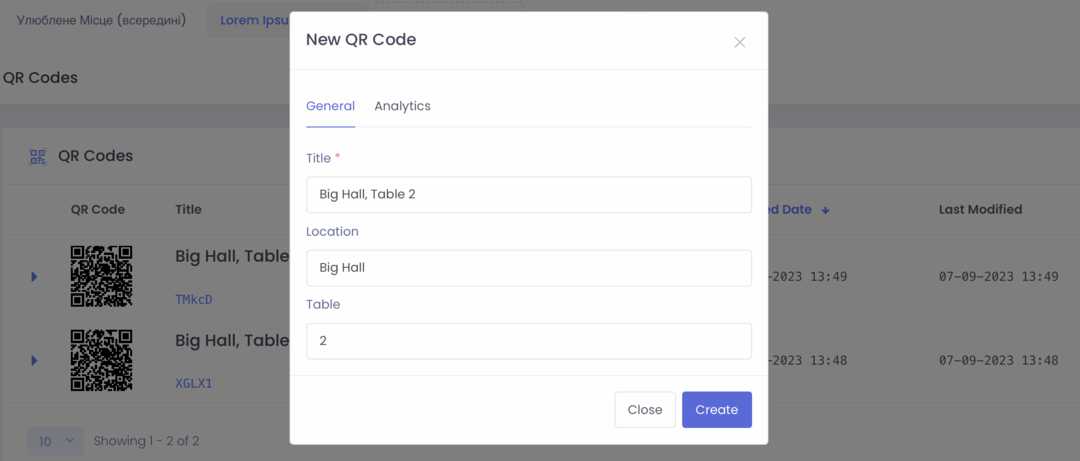
Creating QR codes
Depending on the selected settings, it will be necessary to specify the name of the QR code, its location, and the table number.
To create a new QR code sticker, do the following:
- In the navigation bar, click "QR-codes".
- Click on the "Create QR code" button.
- Enter a name, for example, "Great Hall, Table 10".
- Specify the location, for example, "Great Hall".
- Specify the table, for example, "10".
- Save the changes.
If the names of the "Location" and "Table" fields are displayed differently, check the field names in the order settings.
To save the image of the QR code sticker, click on its icon and click "Save as SVG".
After creating the QR code, you can change the fields, but the changes on the customer side, in the paperless menu, will be adapted only when re-scanning.
Notification settings
The final step, but no less important, is setting up notifications. Thanks to notifications, you will receive requests from customers in a timely manner.
If you have already configured them for orders or for online payment, then this step can be skipped.
Notification configuration is on the same page as "order settings":
- In the navigation bar, click "Order Settings".
- Find the Notification Settings section.
- Enter your e-mail address.
- Enter "Telegram Chat Id".
- Save the changes.

More about notifications: How to Set Up Notifications About New Restaurant Orders by Mail and Telegram?
Testing
Before printing the created QR codes, be sure to test contactless requests on your phone and make sure that everything works as it should.
- Scan the QR code generated by your phone from the admin panel.
- In the digital menu, find the QR code icon and click on the "Request a check" button.
- Check whether the notification in the Telegram channel worked and whether the letter was received at the specified e-mail.
- Also, check for the "Summon Waiter" button.
The video below shows the settings of the touchless menu (in addition to the notification settings) with the ability to call the waiter: